Xolphin Certificate Tool
Since it got more complicated for regular users to order signing certificates after most browsers removed the option, Xolphin now offers her own 'Xolphin Certificate Tool', to ease the ordering process for S/MIME and Code signing. The tool uses the same login credentials as used for regular access to our control panel, but requires a login with API or Admin privileges. This manual is based on version 2.0.1. These manual describes the functions in short, after which each step will be explained in detail.
The Xolphin Certificate Tool provides the following features:
Ordering
- Order a single personal, company personal or company department S/MIME certificate (Issued by Sectigo)
- Order a batch of company personal or company department S/MIME certificates (Issued by Sectigo)
- Order a single Code Signing certificate (Issued by Sectigo)
Installing
- Install a single S/MIME certificate via it's collection code(*)
- Install a batch of S/MIME certificates via a list of collection codes(*)
- Install a single Codesign certificate via it's collection code(*)
(*)After issuance of the certificate, a so-called collection link will be send to the subject of the certificate, the email address you have placed the order for. When placing a larger (batch) order, you need to collect all those unique links before you can download the related certificates for each user. A mail server rule can be practical for this.
Exporting
- Export a keypair as PEM (cert & key) or PFX
Management
- View certificate store contents without requiring the MMC
- View pending requests placed previously with the tool
Installation
To use the Xolphin Certificate Tool, you first need to download the latest version and install it on your (Windows) workstation. The Xolphin Certificate Tool makes use of the Microsoft .Net 5 runtime enviroment, which is a separate additional install.
.Net Installation
- Download the latest .NET Desktop Runtime installer here.
- Double-click the downloaded windowsdesktop-runtime-**.exe file to start the installation
- Follow the installation instructions shown until it's finished.
Be aware to use the version to 'Run desktop apps', and not the 'Run console apps' version.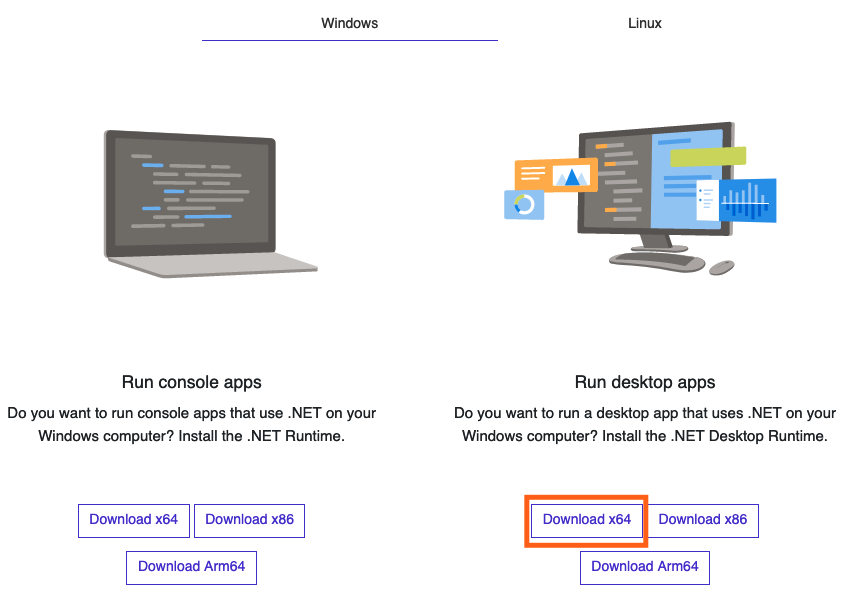
Certificate Tool Installation
- Download the latest version from out Github repository, available at github.com
- Double-click the downloaded MSI file to start the installation
- After finishing the installation you can launch the Xolphin Certificate Tool from Windows start menu
- Your login details can now be set via Settings.
Ordering a single S/MIME certificate
- After launching the application, navigate to the Actions → Sectigo Email Signing (S/MIME) menu item
- Select Order Email Signing Certificate (Single Order)
- Make a selection from the drop-down menu for the product type you want to order:
- Personal
- Employee
- Department
- Fill in the fields that can be edited for the product chosen
- Optional you can enter a purchase order number when your company required you to do so
- After all details are filled, you can click on the Order button to submit your request.
Ordering multiple S/MIME certificates
- After launching the application, navigate to the Actions → Sectigo Email Signing (S/MIME) menu item
- Select Order Email Signing Certificate (Multiple Batch)
- For Batch requests only the Corporate Signature is available and a CSV file can be used as input for names and email addresses
- Fill in the fields that can be edited for the product chosen
- Optional you can enter a purchase order number when your company required you to do so.
- After all data has been entered, the list can be specified with comma separated with the email addresses for all employees for whom a certificate is ordered. Enter one email address per line.
- click on the Order button to submit your request.
Ordering a single Code Signing certificate
- After launching the application, navigate to the Actions → Sectigo Email Signing (S/MIME) menu item
- Select Order Sectigo Code Signing
- Fill in the fields that can be edited for the product chosen
- Optional you can enter a purchase order number when your company required you to do so.
- After all details are filled, you can click on the Order button to submit your request.
Generate CSR and Private Key
- For products where only a public key and Common name is required, the Actions → Generate CSR and Private Key option can be used.
- Fill in the Company Name, Country Code (NL,BE....), and Common Name (www.yourdomain.tld or Firstname Lastname)
- Click Generate.
- Copy all CSR text so it can be used manually on the Xolphin order panel.
Install a single S/MIME certificate
- After launching the application, navigate to the Actions → Sectigo Email Signing (S/MIME) menu item
- Select Install Email Signing Certificate (Single Order)
- Enter the complete URL or just the collection code from the email announcing the issuance of your certificate
- Click install Certificate
- Your certificate can now be configured in your email client
- We urge you to create a backup for your key and certificate (see below)
Install multiple S/MIME certificates in batch
- After launching the application, navigate to the Actions → Sectigo Email Signing (S/MIME) menu item
- Select Install Email Signing Certificate (Multiple Batch)
- You can paste all collection codes in the URL/Codes field, each on their own line
- For easy distribution, select the Export all installed certificates to PFX files option
- Select the location where to place the created PFX files
- Set the password that you want to use for protecting the PFX
Remember to store the PFX files in a save place, remember the set password, and maybe remove the keys from your workstation after all users have their certificates installed.
Install new other than S/MIME certificates
This function requires only your account credentials to be set, and then tries to install all issued certificates found.
Export certificates
The Xolphin Certificate Tool allows to export certificates and key in different formats, currently PFX and PEM are supported.
- After launching the application, navigate to the Certificate Store → Current User → Personal or Certificate Store → Local Computer → Personal menu item, depending on the type of certificate you want to export. The Current User level contains certificates for the User, like email certificate, while the Local Computer level is used for server type certificates like SSL.
- Select the certificate from the list
- Navigate to the Actions → Export Certificate menu
- Select As PFX of As Base64 (PEM)... for the preferred export format.
Remember to store the PFX files in a save place, remember the set password, and maybe remove the keys from your workstation after all users have their certificates installed.
List unfinished requests
After launching the application, navigate to the Certificate Store → Pending Xolphin Orders menu item
Here you see what Xolphin related request are available, that not have completed the validation yet. As soon as the validation is completed and the certificate collected, the request is removed from this list. Ultimately you want this list to be empty.
SSLCheck
Our SSLCheck will examine your website's root and intermediate certificates for correctness and report any potential issues
